


Thank you for joining us for the “30 Ways of Homesteading” Blog Hop by the Prepared Bloggers Network!
If you have been following me for more than a week, you know I am big on food preservation, growing your own food, and learning the skills to get yourself away from the boxed foods (that being said I am overweight and NOT a health nut by any definition so no judgement here! It’s a process!). Over the last 18 months, I have watched the contents of our cupboards change from 99% boxed and canned foods go down to about 25%. When I open the cupboard now I see jars filled with bright, happy colors greeting me and I cannot help but smile. I processed that food; in some cases I even grew the food from a seed so I also know how it was grown and handled. It is an incredibly empowering and satisfying feeling! Along the way, I have had failures and successes alike but one of the things I learned was how to make these A-MAZ-ING jars of ready-to-go food that I call “Stew Starters.” The idea is a simple one and anyone can do it; even if you do not have the ‘specialized equipment.’
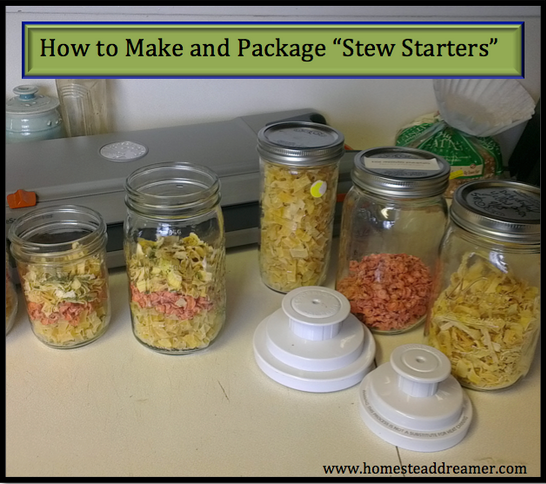
In My Triad of Food Preservation, I talked about how I dehydrate excess veggies from the harvest or some food that was on a really great sale. I also touched briefly on how I make these Stew Starters. I will go into more detail later but let’s cover the basics first. You will need:
- Jars, lids, and bands. The size depends on several factors such as how many are being fed, how you plan on cooking the food, etc.
- Dehydrated veggies such as potatoes, carrots, onions, and whatever else you want. You can dehydrate vegetables in the oven: you do not need a dehydrator (but it does make it easier!).
- Dry spices and herbs.
- Thickening agent (like corn starch, optional)
- Vacuum sealer and sealing lid attachments (optional) or vacuum seal in a bag!
To make a Stew Starter, you simply layer your dehydrated vegetables in the jar or vacuum seal bag and add in seasonings as desired. Keep in mind that it is much easier to add more than it is to take some out so go on the lighter side when it comes to adding herbs and spices. After you have eaten several of them it will be easier to adjust to suit your taste. I generally add more potatoes than anything though one time I did have an onion-heavy jar. It was still incredibly good!
I add in all sorts of spices and herbs to mine. I also will put some corn starch or other thickening agent in there to help the broth get more a stew texture. If you do not add any in, you will end up with more of a soup. Remember that dehydrated food has a stronger flavor. If you are not a big onion fan, be sure to go extra light when layering! It may not look like you put much in there but when it absorbs the moisture, it will double in size. I also add in some kind of jarred meat I have processed and make sure every bit of the meat broth gets in there, too. It is heavenly and adds to the overall flavor.
The colors of the dehydrated vegetables add a visual appeal on the shelf, too!
Water Measurement. Measuring the water can be tricky but I have come up with a pretty good way to make sure there is enough for rehydration and extra for a broth. In most cases it is a safe bet that if you add water until it just covers the dehydrated food – with nothing sticking above the water line – is enough to rehydrate the contents. If it is potato heavy, a little more will be needed. Adding in a little more than double the water will ensure there is enough to plump up the veggies and provide the base for the broth.
Jar or Bag? If you do not have a vacuum sealer, a jar with a lid is the best option. If you do have a vacuum sealer, you can use either the jar or the bag but a word of caution; should you choose to vacuum seal the mix, be sure to stop the vacuum before it gets too tight! The sharp corners of the dehydrated food will puncture holes in the bag, thus defeating the purpose of sealing it!
Size considerations. If you are a family of two, I suggest you use a pint jar about 2/3rd filled with goodies. For a family of four, a quart jar again about 2/3rds full should suffice. Both of these measurements should leave a little bit of leftovers but each family is different. You will have to play around with it until you get it right for yours.
Cooking method. Are you able to use a pot and stove? A crock pot? How about just the jar or bag you packaged the food in? I have done all three methods as experiments. The crock pot is, hands down, the best and easiest method. It ensures the veggies (especially potato cubes) are fully rehydrated and allows time for all the flavor to seep into the meat and veggies.The jar was more problematic because of the heat loss. You want to put boiling water into the jar to rehydrate first. You may need to wait 45-60 minutes as it will cool down quickly. Putting hot water in is important with this method because it will rehydrate faster than if you just put cold water and some carrot slices into a bowl (2 hours depending on thickness).If you choose to cook it in a vacuum sealer bag; proceed with caution. This is not the recommended way for cooking this food however it will work in a pinch. It will take longer than even the jar cooking method does but it could literally save you in a SHTF situation.
You can also opt to cook it all day in a crock pot on low (7-8 hours) or can speed the process up by tossing it all into a pot on medium-high heat with a lid until everything is tender. The stove top pot method will take about an hour and is far superior to anything you can buy in the store that keeps longer than 3 months. Of course, I am biased. 😉
SIDE BENEFITS. I originally made these from a picture I had seen on Pinterest and Facebook and thought it looked like a very cool project. I loved the idea of being able to take one of these out with a jar (or can) of meat, combine, heat, and serve. What I hadn’t thought of though is what makes this absolutely priceless for me: So long as you ensure the veggies are fully dehydrated and are able to vacuum seal the air out they will last well over a year. YES! Over a year! So long as the storage conditions include a dark, dry and cool place there is no reason why these shouldn’t be as good after 14 months as they were to start. Take that Hamburger Helper! I personally would cut the time off at 18-24 months but that is my personal preference. We have eaten one that was 13 months old and it was delicious! I have another jar that I plan on keeping until the 2 year mark. We will try it and I plan on reporting about it further.
What ways do you get away from the canned/boxed store-bought meals? Share with us below in a comment and we may feature it on a future post!
May contain affiliate links

The Prepared Bloggers Network is at it again! We’re glad you’ve found us, because the month of April is all about homesteading.
Homesteading is a lifestyle of self-sufficiency. It is characterized by growing your own food, home preservation of foodstuffs, and it may even involve the small scale production of textiles, clothing, and craftwork for household use or sale. Most importantly homesteading is not defined by where someone lives, such as the city or the country, but by the lifestyle choices they make.
The Prepared Bloggers are passionate about what they do and they each have their own way of achieving self-sufficiency. Grab your favorite drink and enjoy reading about the 30 Ways of Homesteading!
Crops on the Homestead
Straw Bale Gardening from PreparednessMama
Crop Rotation for the Backyard Homesteader from Imperfectly Happy
Benefits of Growing Fruit from SchneiderPeeps
Succession Planting: More Food in the Same Space from 104 Homestead
Crops to Grow for Food Storage from Grow A Good Life
Winter Gardening Series from Our Stoney Acres
How To Build a Raised Garden Bed For Under $12 from Frugal Mama and The Sprout
How to Save Carrot Seeds from Food Storage and Survival
Animals on the Homestead
Getting Your Bees Started from Game and Garden
Homesteading How-To: Bees from Tennessee Homestead
How to Get Ready for Chicks from The Homesteading Hippy
Selecting a Goat Breed for Your Homestead from Chickens Are a Gateway Animal
Adding New Poultry and Livestock from Timber Creek Farm
Beekeeping 101: 5 Things To Do Before Your Bees Arrive from Home Ready Home
How to Prepare for Baby Goats from Homestead Lady
How to Prevent and Naturally Treat Mastitis in the Family Milk Cow from North Country Farmer
Tips to Raising Livestock from Melissa K. Norris
Raising Baby Chicks – Top 5 Chicken Supplies from Easy Homestead
Making the Homestead Work for You – Infrastructure
Ways to Homestead in a Deed Restricted Community from Blue Jean Mama
Building a Homestead from the Ground Up from Beyond Off Grid
DIY Rainwater Catchment System from Survival Prepper Joe
Finding Our Homestead Land from Simply Living Simply
I Wish I Was A Real Homesteader by Little Blog on the Homestead
Endless Fencing Projects from Pasture Deficit Disorder
Essential Homesteading Tools: From Kitchen To Field from Trayer Wilderness
Homesteading Legal Issues from The 7 P’s Blog
Why We Love Small Space Homesteading In Suburbia from Lil’ Suburban Homestead
Preserving and Using the Bounty from the Homestead
How to Dehydrate Corn & Frozen Vegetables from Mom With a Prep
How to Make Soap from Blue Yonder Urban Farms
How to Render Pig Fat from Mama Kautz
How to Make Your Own Stew Starter from Homestead Dreamer
Why You Should Grow and Preserve Rhubarb! from Living Life in Rural Iowa
It’s a Matter of Having A Root Cellar…When You Don’t Have One from A Matter of Preparedness

Were you going to list some of your faves and the recipes for them? I have just begun this dehydrating/vacuum sealing thing. But need a little more guidance. I’ve got a garden in and hoping to preserve some of it.
Hi Mickey!
I would LOVE to help you with learning more about dehydrating and vacuum sealing. As far as recipes go, I admit I rarely use them. I mostly make them up and keep adding spices until it ‘feels right.’ That being said, here is the basic stew starter I make:
QUART SIZE:
2-3 inch layer of dehydrated potato cubes
1 inch layer of dehydrated carrot slices
1/2 – 1 inch layer of dehydrated onion slices
Sage
Garlic Powder
Parsley
Oregano
Cracked Pepper
Corn Starch
Sometimes I will add in some dry brown gravy mix for the additional thickening properties and salt flavor but I am getting more and more away from that. Usually the corn starch and some sea salt is the way I make them anymore.
I hope this helps! You can make another comment here or head over to my Facebook page (www.facebook.com/homesteaddreamer) and post a message with more detailed questions. Whatever works for you. Thank you for the comment, questions, and following along!
Thanks for answering! I came over again from your fb page, otherwise I would not have seen it :P. I really want to have quick meals all prepped and vacuum sealed. Hope my carrots do well this year…I need to have my soil tested I think…too acidic or something; my root veggies haven’t done well for a few years.
Funny you mention the soil: if we were going to be staying where we are at, I would be doing serious soil amendment this Fall and Winter. Things just aren’t as green and bountiful as last year. Live and learn! Glad you saw the reply Mickey and thanks again for following my foibles and adventures!
Hi there HSdreamer!.
You have a wonderful website! I love it, even without checking it entirely yet!.
My question is:
I live in a very humid and warm area of the world, with a tropical climate. Our pantry is usually in the 80% of humidity, with Temperature oscilating between 82-86F. How can we safely store jars with stew/soup starters without freezing? is that even possible in this hot weather.?…
Thanks in advance and for your advice!.-
Joseph.
Hello! Sorry it took so long to reply. No, those temperatures are not safe to store food in jars long term at all. The heat can soften seals which leads to potential bacteria getting in there or causing ‘false seals’ which can then lead to illness.
Don’t lose hope! I suggest research ways to make earthen type store if possible. Wet sand lining the inside of a clay flowerpot with another clay flowerpot is something I’ve seen before but for larger storage, you need to rezearch. Thanks for the question and for coming by!